How to Clean White Sneakers at Home (Step-by-Step)
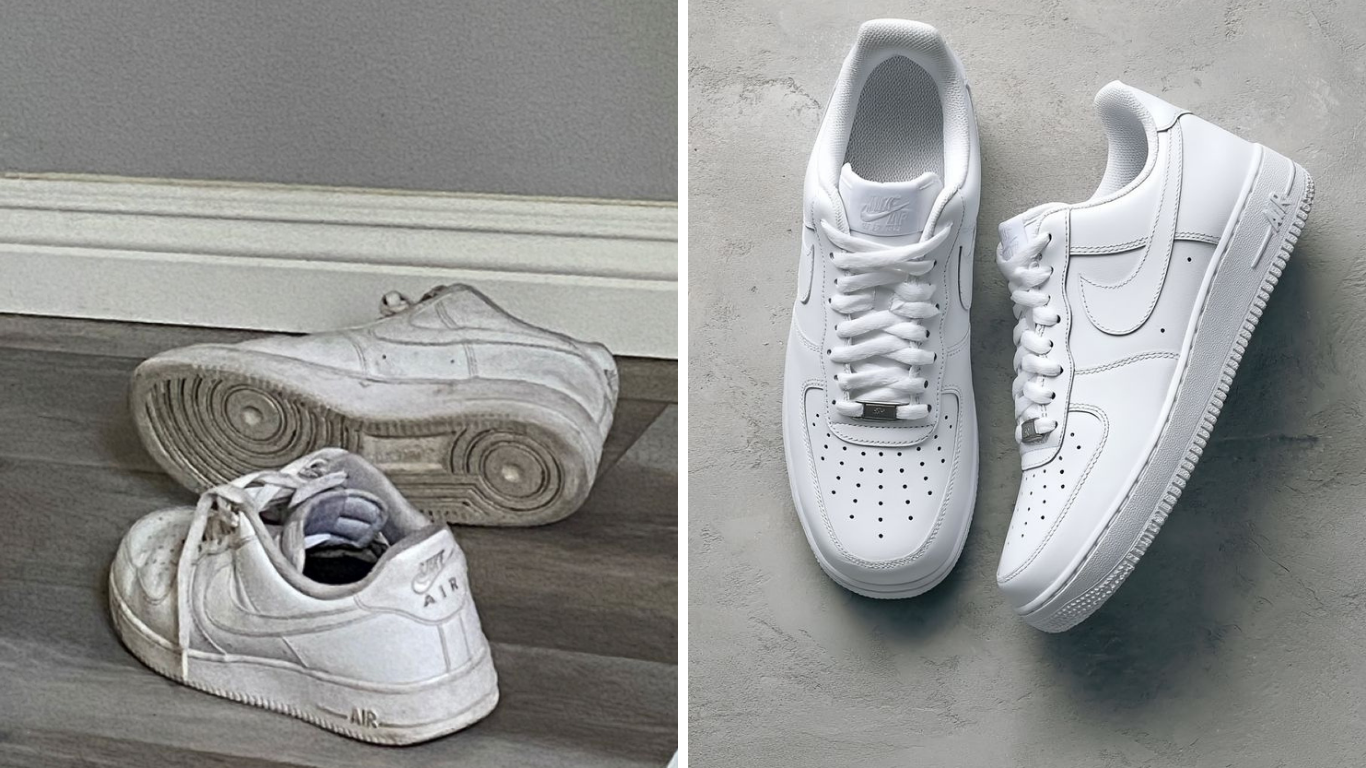
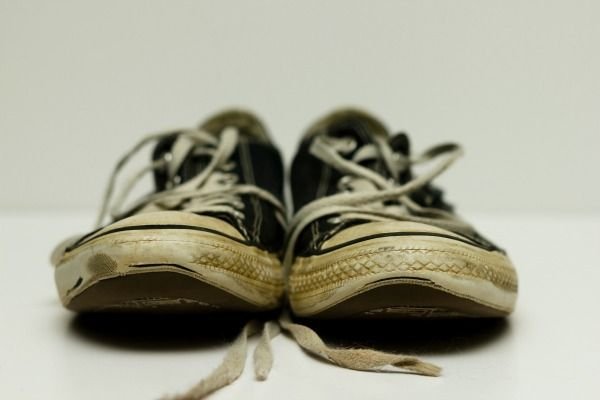
We’ve all been there — white sneakers that look like they’ve lived through a mudslide. If you’re staring at a pair that’s gone from crisp to catastrophic, knowing how to clean white sneakers at home is the skill that’ll save them (and your wallet).
The good news? You don’t need a fancy cleaning kit or a miracle product. Just a few things from around the house and about 20 minutes of your time.
This guide walks you through every step, from sole to toe cap.
The short version:
- Remove laces and knock off any loose dirt before you start.
- Mix a cleaning solution with dish soap and warm water (or baking soda and white vinegar for tougher stains).
- Scrub the uppers gently with an old toothbrush using small circular motions.
- Wipe clean with a damp cloth, then pat dry — never wring or machine dry.
- Air dry in a shaded spot, stuffed with paper towels to hold their shape.
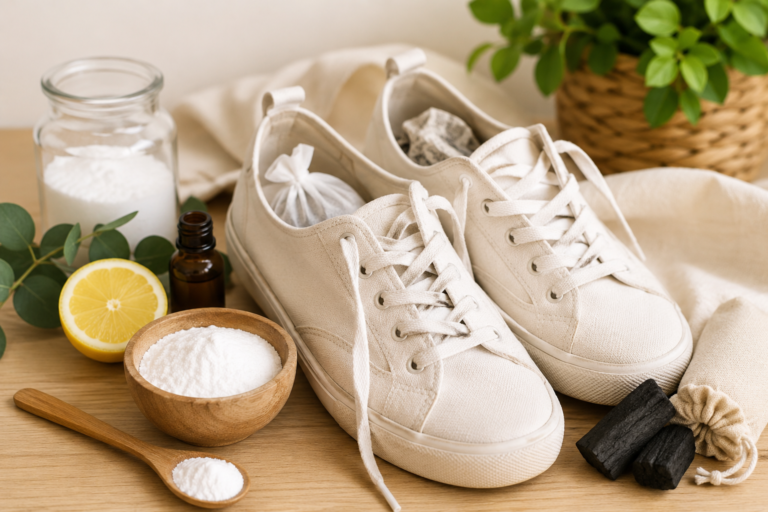
What You’ll Need
- An old toothbrush (soft bristles work best)
- A clean microfibre cloth or old t-shirt
- Mild dish soap
- Baking soda
- White vinegar
- Warm water
- A small bowl
- Paper towels or white tissue paper
No magic sprays required. You almost certainly have all of this already.

Read also: 20 Ways to Style White Sneakers for Men (Outfit Ideas)
Step-by-Step Instructions
Step 1: Remove the Laces and Shake Off Loose Dirt
Take the laces out before you do anything else — this gives you proper access to the tongue and eyelets, and prevents you from grinding dirt further into the fabric while scrubbing.
Hold the sneaker over a bin or outside and knock the soles together firmly to dislodge dried mud, grit, and debris. Use a dry toothbrush to brush off anything still clinging to the surface. Starting on a relatively dry, dirt-free shoe makes every step after this easier and more effective.

Step 2: Pre-Soak Your Laces
Drop the laces into a small bowl with warm water and a few drops of dish soap. Let them soak while you work on the shoes — by the time you’re done, they’ll need just a light scrub and a rinse. If they’re seriously yellowed, add a tablespoon of baking soda to the soak. Most white laces come back to life with almost zero effort. Once clean, lay them flat to dry — don’t wring them out or they’ll stretch.
Quick tip: If your laces are beyond saving, a fresh pair costs less than a coffee. Replacing them is the single easiest way to make old sneakers look new again.
Step 3: Mix Your Cleaning Solution
For everyday dirt and scuffs, mix one teaspoon of dish soap with a cup of warm water in a small bowl — that’s it. For stubborn stains or yellowing, swap this out for a paste of two tablespoons of baking soda and one tablespoon of white vinegar. It’ll fizz up briefly (totally normal) then settle into a thick, gentle paste. I made the mistake of using bleach once. Once. It turned my canvas sneakers a lovely shade of yellow that never fully went away. Stick to these gentler options.
Step 4: Scrub the Uppers Using Circular Motions
Dip your toothbrush into the cleaning solution and work it into the upper in small circular motions — don’t scrub in straight lines, which can damage the material and push dirt deeper into the fibres. Work section by section: toe box first, then sides, then tongue.
Apply light to medium pressure; you’re coaxing the dirt out, not attacking the shoe. For canvas or mesh, be especially gentle around the seams. Reapply solution as needed and don’t let it dry on the shoe before wiping.
Quick tip: For leather or synthetic leather sneakers, skip the baking soda paste and stick to the dish soap solution. The paste can be slightly abrasive and dull the finish over time.
Step 5: Tackle the Soles
The soles take the most abuse, so they can handle a little more pressure. Use the same toothbrush (or a stiffer nail brush if you have one) with the baking soda paste and scrub the midsoles and rubber outsoles thoroughly. Get into the grooves of the tread — that’s where mud likes to hide.
A cotton swab dipped in solution works perfectly for detailed areas around the sole edge. Rinse the brush frequently so you’re not just moving dirt around.
Step 6: Wipe Clean and Air Dry
Use a clean damp cloth to wipe away all the cleaning solution from the uppers and soles — residue left behind can attract new dirt or leave a white film once dry. Pat (don’t rub) the surface gently with a dry cloth to absorb excess moisture.
Stuff each shoe firmly with white paper towels or white tissue paper to help them hold their shape as they dry. Then place them in a well-ventilated spot away from direct sunlight. Direct sun can yellow white materials over time, so shade is your friend here. Allow at least 6–8 hours to dry fully before wearing.
Common Mistakes to Avoid
- Throwing them in the washing machine. It’s tempting, but the agitation can warp the sole, break down the glue, and damage the structure — especially on leather or suede styles.
- Using bleach on canvas or mesh. It feels logical on white fabric, but bleach causes oxidation that yellows the material. It’s the thing you regret immediately and slowly.
- Scrubbing when the mud is still wet. Let mud dry completely first. Wet mud spreads; dry mud brushes off. Patience here saves you double the work.
- Using coloured cloths or paper towels to stuff the shoes. The dye can transfer to damp white fabric while drying. Always use white paper or tissue.
- Air drying in direct sunlight or near a heat source. Heat warps soles and yellows fabric. A breezy, shaded spot is all you need.
How to Prevent the Problem Next Time
- Apply a water and stain repellent spray after cleaning and after every few wears. It creates an invisible barrier that makes future cleaning much easier. [INTERNAL LINK: Shoe Care]
- Wipe them down after every wear — even a quick 30-second wipe with a damp cloth stops surface grime from setting in.
- Rotate your shoes. Wearing the same pair every single day doesn’t give them time to air out properly between uses.
- Store them in a cool, dry place away from sunlight. A shoe box or breathable dust bag keeps them clean and prevents yellowing from UV exposure.
- Deal with stains immediately. Fresh stains are dramatically easier to remove than ones that have had a day or two to set.
FAQ
How do I clean white sneakers at home without any special products? Dish soap and warm water is genuinely all you need for most everyday dirt. Mix a teaspoon of soap into a cup of warm water, scrub with an old toothbrush, and wipe clean. For tougher stains, a baking soda and white vinegar paste works brilliantly — both are kitchen staples.
How do I get yellowing off white sneakers? Yellowing is usually caused by oxidation, sun damage, or bleach residue. Make a paste with baking soda and a small amount of white vinegar, apply it to the yellowed areas, let it sit for 10–15 minutes, then scrub gently and rinse. Repeat if needed. For soles, a magic eraser (melamine foam) works extremely well on rubber yellowing.
Can I put white sneakers in the dryer after cleaning? No — heat from a dryer warps the sole, breaks down adhesives, and can shrink certain materials. Always air dry at room temperature, stuffed with paper towels to maintain their shape. It takes longer but it protects your shoes.
How often should I clean my white sneakers? A quick wipe-down after each wear goes a long way. A full clean every 2–4 weeks (depending on how often you wear them) keeps them looking consistently fresh without the need for a major rescue mission.
Final Thoughts
Cleaning white sneakers at home really is as straightforward as it sounds once you know the steps. No specialist kit, no expensive products — just a bit of time and the right technique. Your sneakers will thank you, and honestly, there’s something deeply satisfying about seeing them come back to life. Bookmark this article so it’s ready the next time a muddy afternoon threatens your favourite pair.